
Steps to Create a Wifi Hotspot using cmd in Windows 7/8/10
You have ultra fast Broadband for your PC, laptop and wish to share that connection to your other devices too. You probably hate downloading software for it that may mess with your computer. You can do this using simple command line tricks. Yep, a few lines and you are ready to go. It’s easy to create a Wifi Hotspot using cmd rather than downloading a software that can be also mess up with your PC. Hence, we will share a simple trick for creating hotspot in your Windows 7/8/10. This tutorial will work on every Windows system.
Also Read:
- Steps to fix Common WiFi problems
- Easy Steps to Hack Wifi data using Wireshark
- Steps to Hack WiFi using Kali Linux (with Reaver)
Steps to create Wifi Hotspot using cmd:
Follow the below steps carefully to create a Wifi Hotspot using cmd:
First of all, open command prompt in your Windows. To open command prompt(cmd), click on start and search cmd on search box. now right-click on cmd and click “run as administrator”. Always open command prompt using the administrative privileges. Another alternative is to open Run (Windows + R) and type cmd and click enter to open command prompt.
First of all, we have to check whether your PC supports Hosted network or that. That means that if your network card is capable of creating a hotspot or not. To do so, type the following command in cmd:
netsh wlan show drive
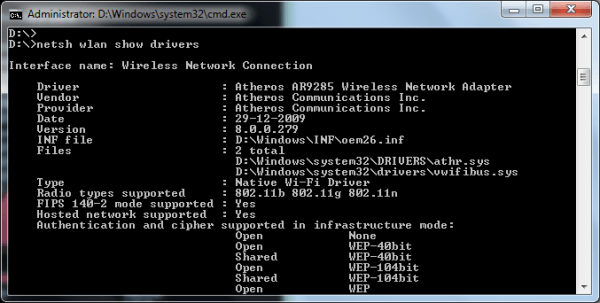
You will get a list of Hosted network settings. If you got an output as HOSTED NETWORK SUPPORTED: YES, it means that wifi hotspot can be created in your system. Now let’s begin with creating a wifi hotspot.
- Open cmd(command line) using Administrative Privileges(Run As Administrator).
- Now type following lines sequentially:
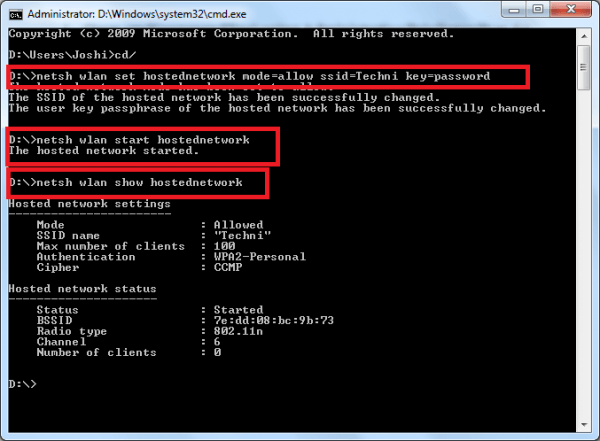
netsh wlan set hostednetwork mode=allow ssid=Techni key=password
(Replace “techni” with your Wifi Hotspot name and “Password” with a Wifi hotspot password)
3: Now type below command to start the Hotspot network you just created
netsh wlan start hostednetwork
4: To see if WiFi hotspot is created, type: netsh wlan show hostednetwork
You are done. Enjoy!! Wifi hotspot will be created with Network name “Techni” and password as “password”.
To stop the Wifi Hotspot type the following command in Command Line:
netsh wlan stop hostednetwork
The Wifi hotspot network will be stopped immediately. This trick can be used in any Windows Operating system. You can also create a Wifi Hotspot by going to Network and Sharing centre in Control Panel. But it will take more time. Hence we recommend you to create Wifi hotspot using cmd.
Note : You may change
- ssid=”Any name you want”.
- key=”Any password you want”.
You may even convert it into a script file(i.e. *.bat file where “ * ” could be any name.
- Just open notepad.
- Copy the code from above.
- Save the file using a *.bat extension.
Ex: Wifi.bat
Choose “All Files” in Save As Type option.
- When running, make sure you run as Administrator using “Run As Administrator option when you right-click it”.
Enjoy Surfing…..
If you are still facing any problems while creating a Wifi hotspot via cmd, comment below.
I HAVE TRIED BUT IT CAN’T CONNECT
What problem are you having?
wifi is created but internet is not shared pls help
m not able to create hotspot……m using an admin account bt its asking for a administrative account…
You have to open command prompt as an administrator. To do so click on Start, search for cmd, right click on cmd and select “run as administrator”.
I create the hotspot but it wont connect just obtianing IP address, Yes I did run as admin using a win 7 machine. still not working
U need to reset your Wifi adapter. Go to Network Settings, Then Go to Adapter Settings and reset it.
Also make sure, you have Sharing enabled for your wifi network.
Thank you for sharing this article i got hotspot……..it has been working in my windows
How to hack a wifi password that i couldn’ use as before …pls tell me
i want to connect with my neigbour wifi but they didn’t tel me pas nd not conect before